

Trying hard not a half ass this newsletter but please keep reading. I’m three weeks into my relocation to NY and still not in my own house. It needed a lot of work, new roof, new windows, etc, and in taking a few walls down they found out all the electric was still running on knob and tube. (Here’s a clip of knob and tube’s Wikipedia page incase you’re unfamiliar: “Knob and tube wiring is an early standardized method of electrical wiring in buildings, in common use in North America from about 1880 to the 1930s.”)
So that and the ages it took the building department to stamp permits I’m still crashing at my sisters and trying to get my footing. I’m exhausted but the foliage is stunning right now. And with the stunning foliage comes deep fall weather. Leather weather, sweater weather, quilt coat weather, etc.
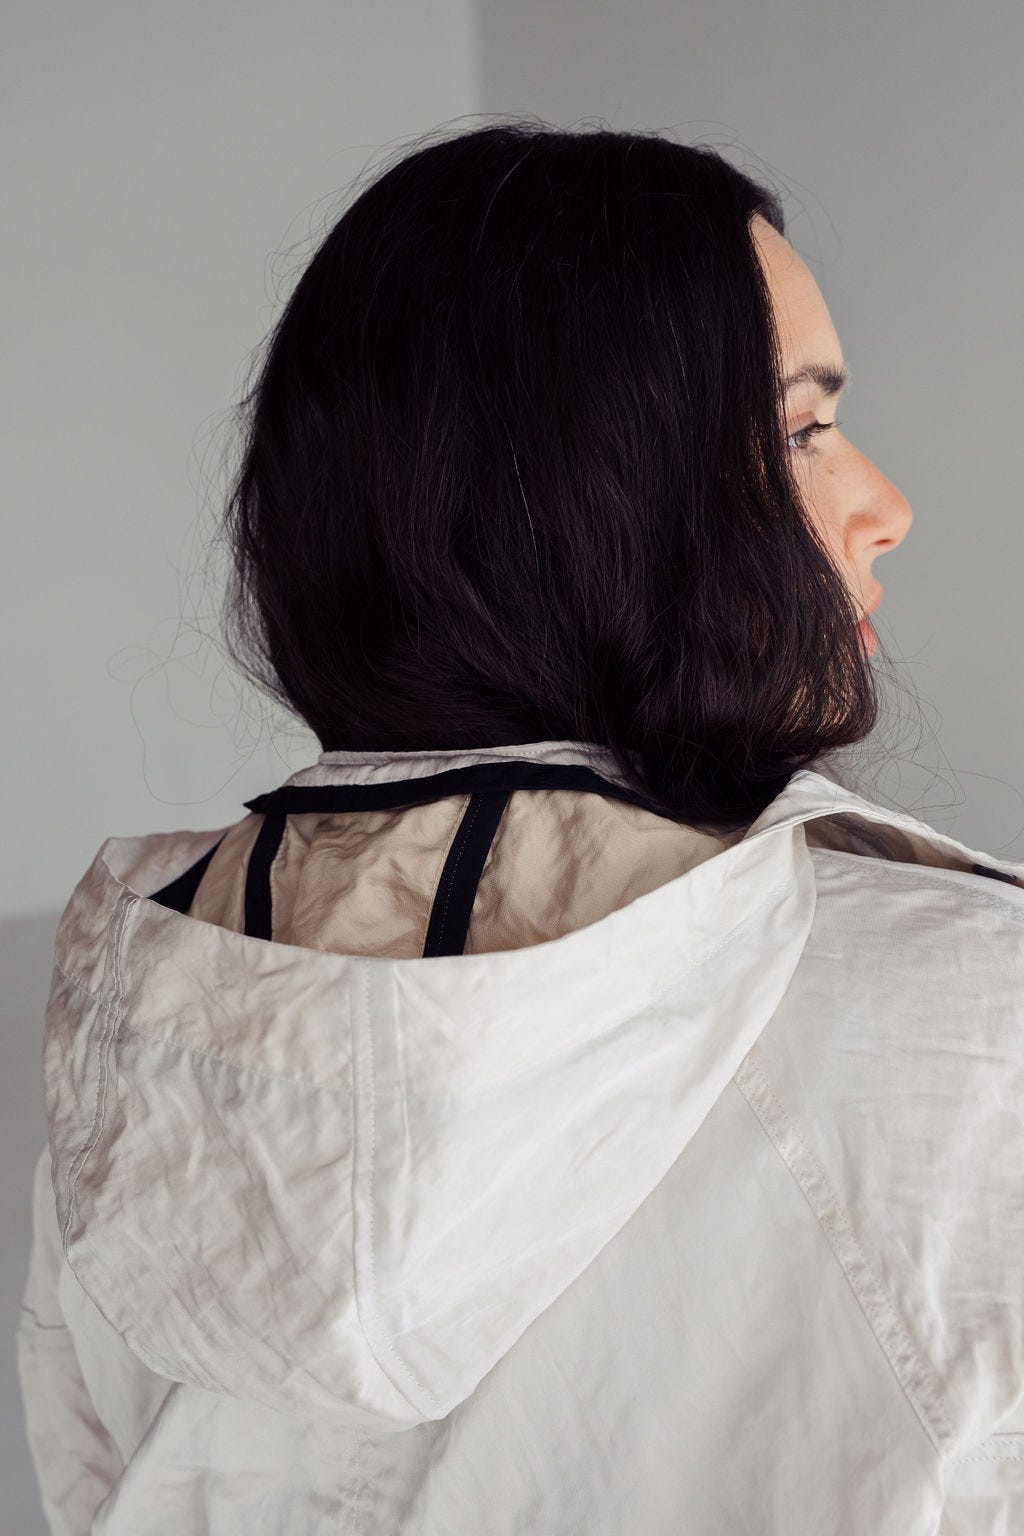
Allow me to reintroduce you to the Thompson Coat and it’s new friend The Thompson Quilt Coat.
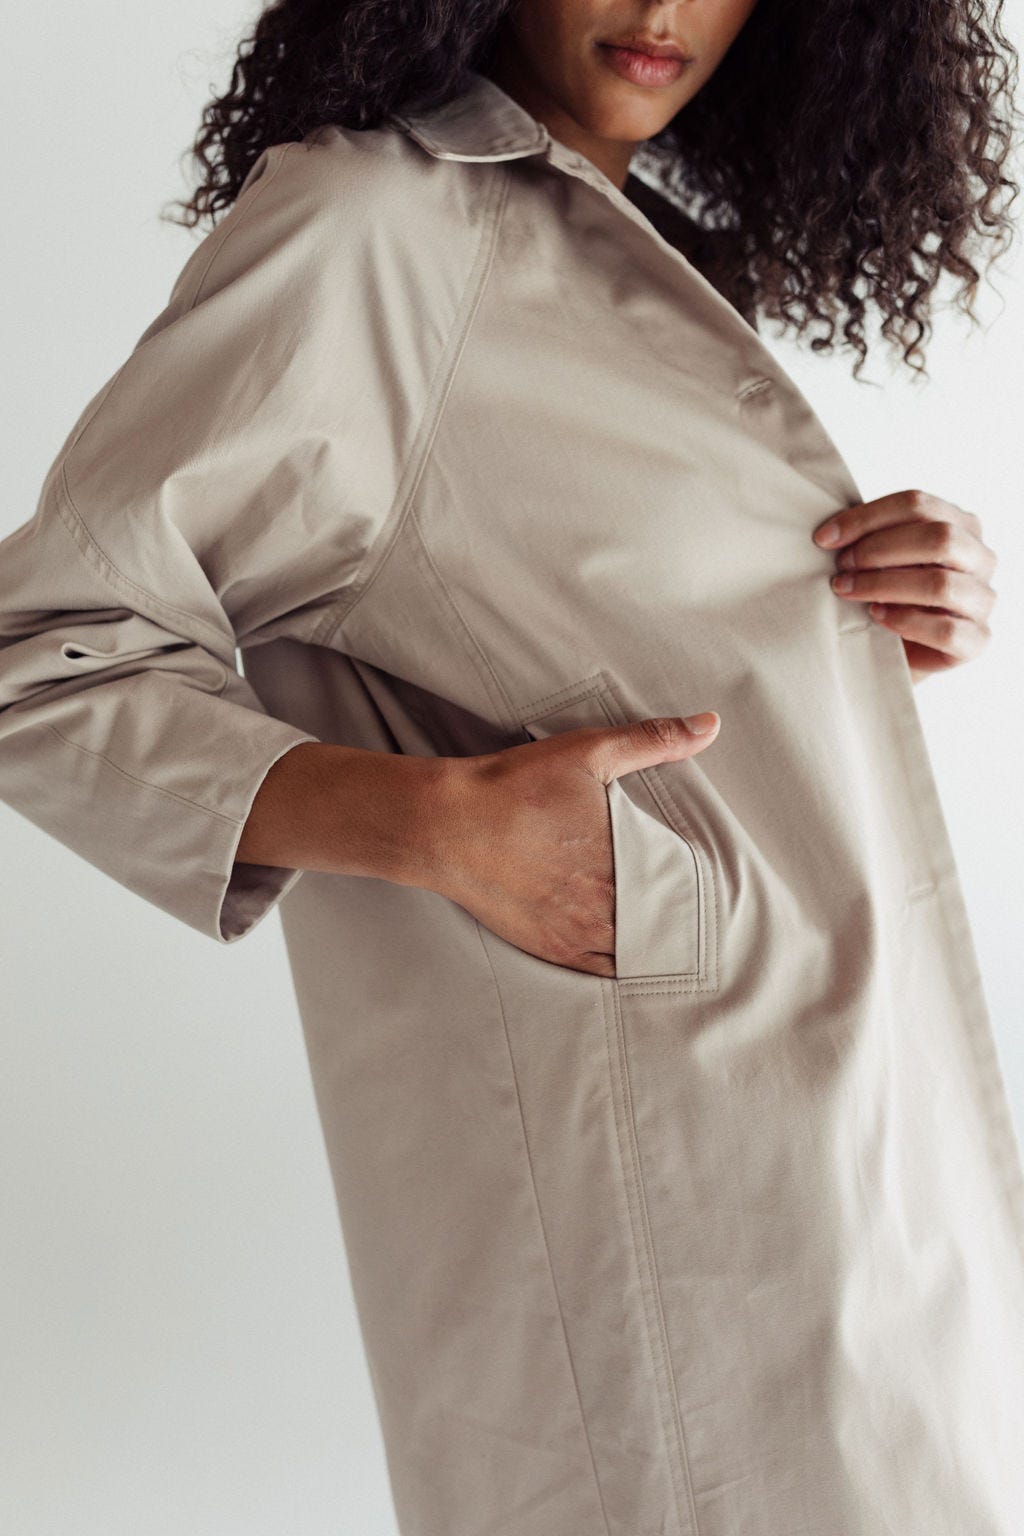
I love this coat so much. It’s weird to say but these updates feel a bit like my first born graduating high school or something. The Thompson was one of the first four patterns I released when Daughter Judy started. I remember when I was designing it how easily it came together. I don’t remember hemming and hawing about the details they all just fit.
It was created to be a simple chore/barn/field type jacket that could carry a variety of fabrics. I think most patterns like this are blank canvases for fabric and this one really is a chameleon. Some of my favorite interpretations have been the oilskin Barbour type creations and there’s nothing better than denim with all the heavy topstitching.
In the almost 3 years of running Daughter Judy I’ve learned so much about how you all operate in your sewing plus I get loads of feedback that all gets thoroughly considered. (Seriously, if you have feedback I want to hear it!) The biggest ask for the Thompson Coat was a lining for it. Multiple people a month would ask if it had a lining or if there was a video on how to create a lining since some people had done it themselves and tagged on socials. So now you can fully line your coat with the Thompson Coat Lining expansion.
Also in the feedback has been the need for a bit more detail in places. I’ve been trying to figure out the grey space of writing non-beginner patterns as beginner accessible because I don’t want to bore the people who are, not beginners. You’ll see stronger instructions here but hopefully not too too much hand holding.
Lastly, just for fun I added a detachable hood because why not. You deserve it.
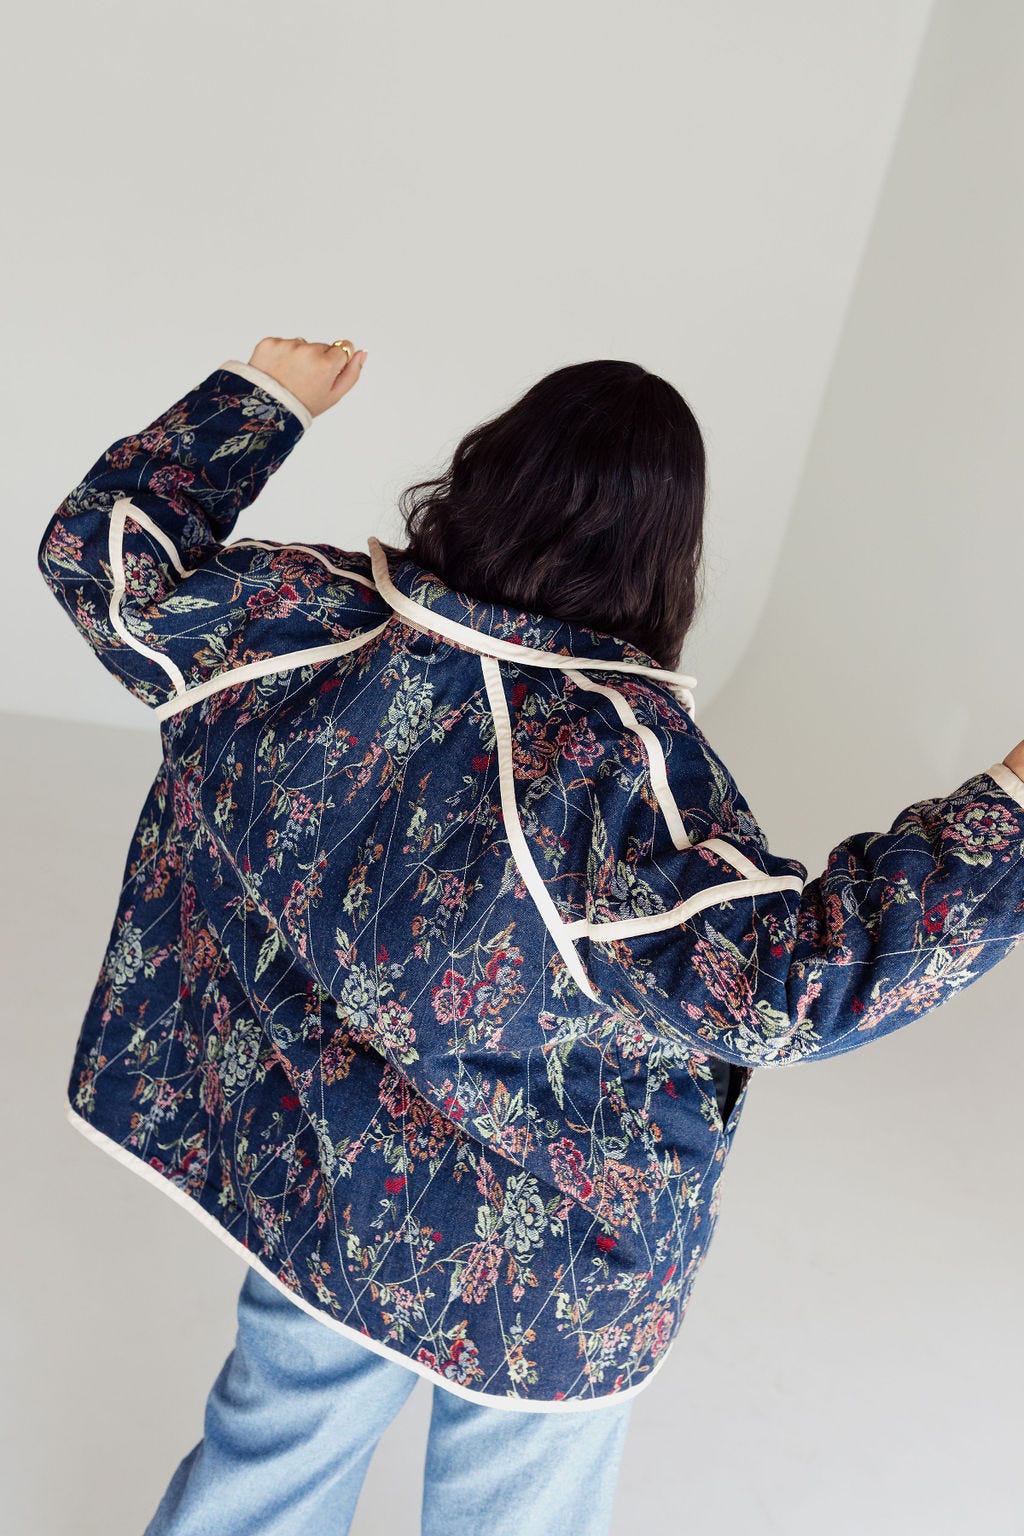
Then we have the new quilt coat version. Some you will remember me making the above sample a few years back. I had come across an image of a quilt coat with taping by Isabel Marant and figured this was my excuse to hack the Thompson even though it felt like a sea of quilt coats in the home sewing world.
I wear that coat non-stop in winter and now wish I had more of that fabric to make the hood. I did however make a belt with a side release buckle because I’m too terrified to put buttonholes in this baby. So I guess that’s a hot tip for this style : Omit the fingers crossed they go in OK buttonholes and swap for a belt.
Another tip is don’t be afraid to soften any curves (collar points, top of neck) for easier machine handling. Hand sewing the binding will also give you the cleanest finish and more control.
Both coats can really take you in any direction. Low loft quilted barn coat with corduroy collar. Ultra lightweight nylon packable. Heavy puffer with fleece lined hood. Cropped wool gabardine with horn buttons.
I think this coat will be in my library for quite a while and wonder what’s next in the outerwear category when this perfect beauty already exists.

What was updated on the original pattern? Do I need to reprint everything or can I just print the hood part?
DD size range : Minor adjustment to the sleeve opening on the smaller sizes (XS + S). I had a call out that it was hard to get the opening over machine posts so I opened these sizes a bit more. If you are using your old pieces and adding the lining, cut a new SLEEVE BOTTOM 9 and SLEEVE CUFF 10. I also changed the collar to have a top collar and under collar piece for better turning. Hem fusing was also added to the pattern but fusing is always optional depending on your desired outcome.
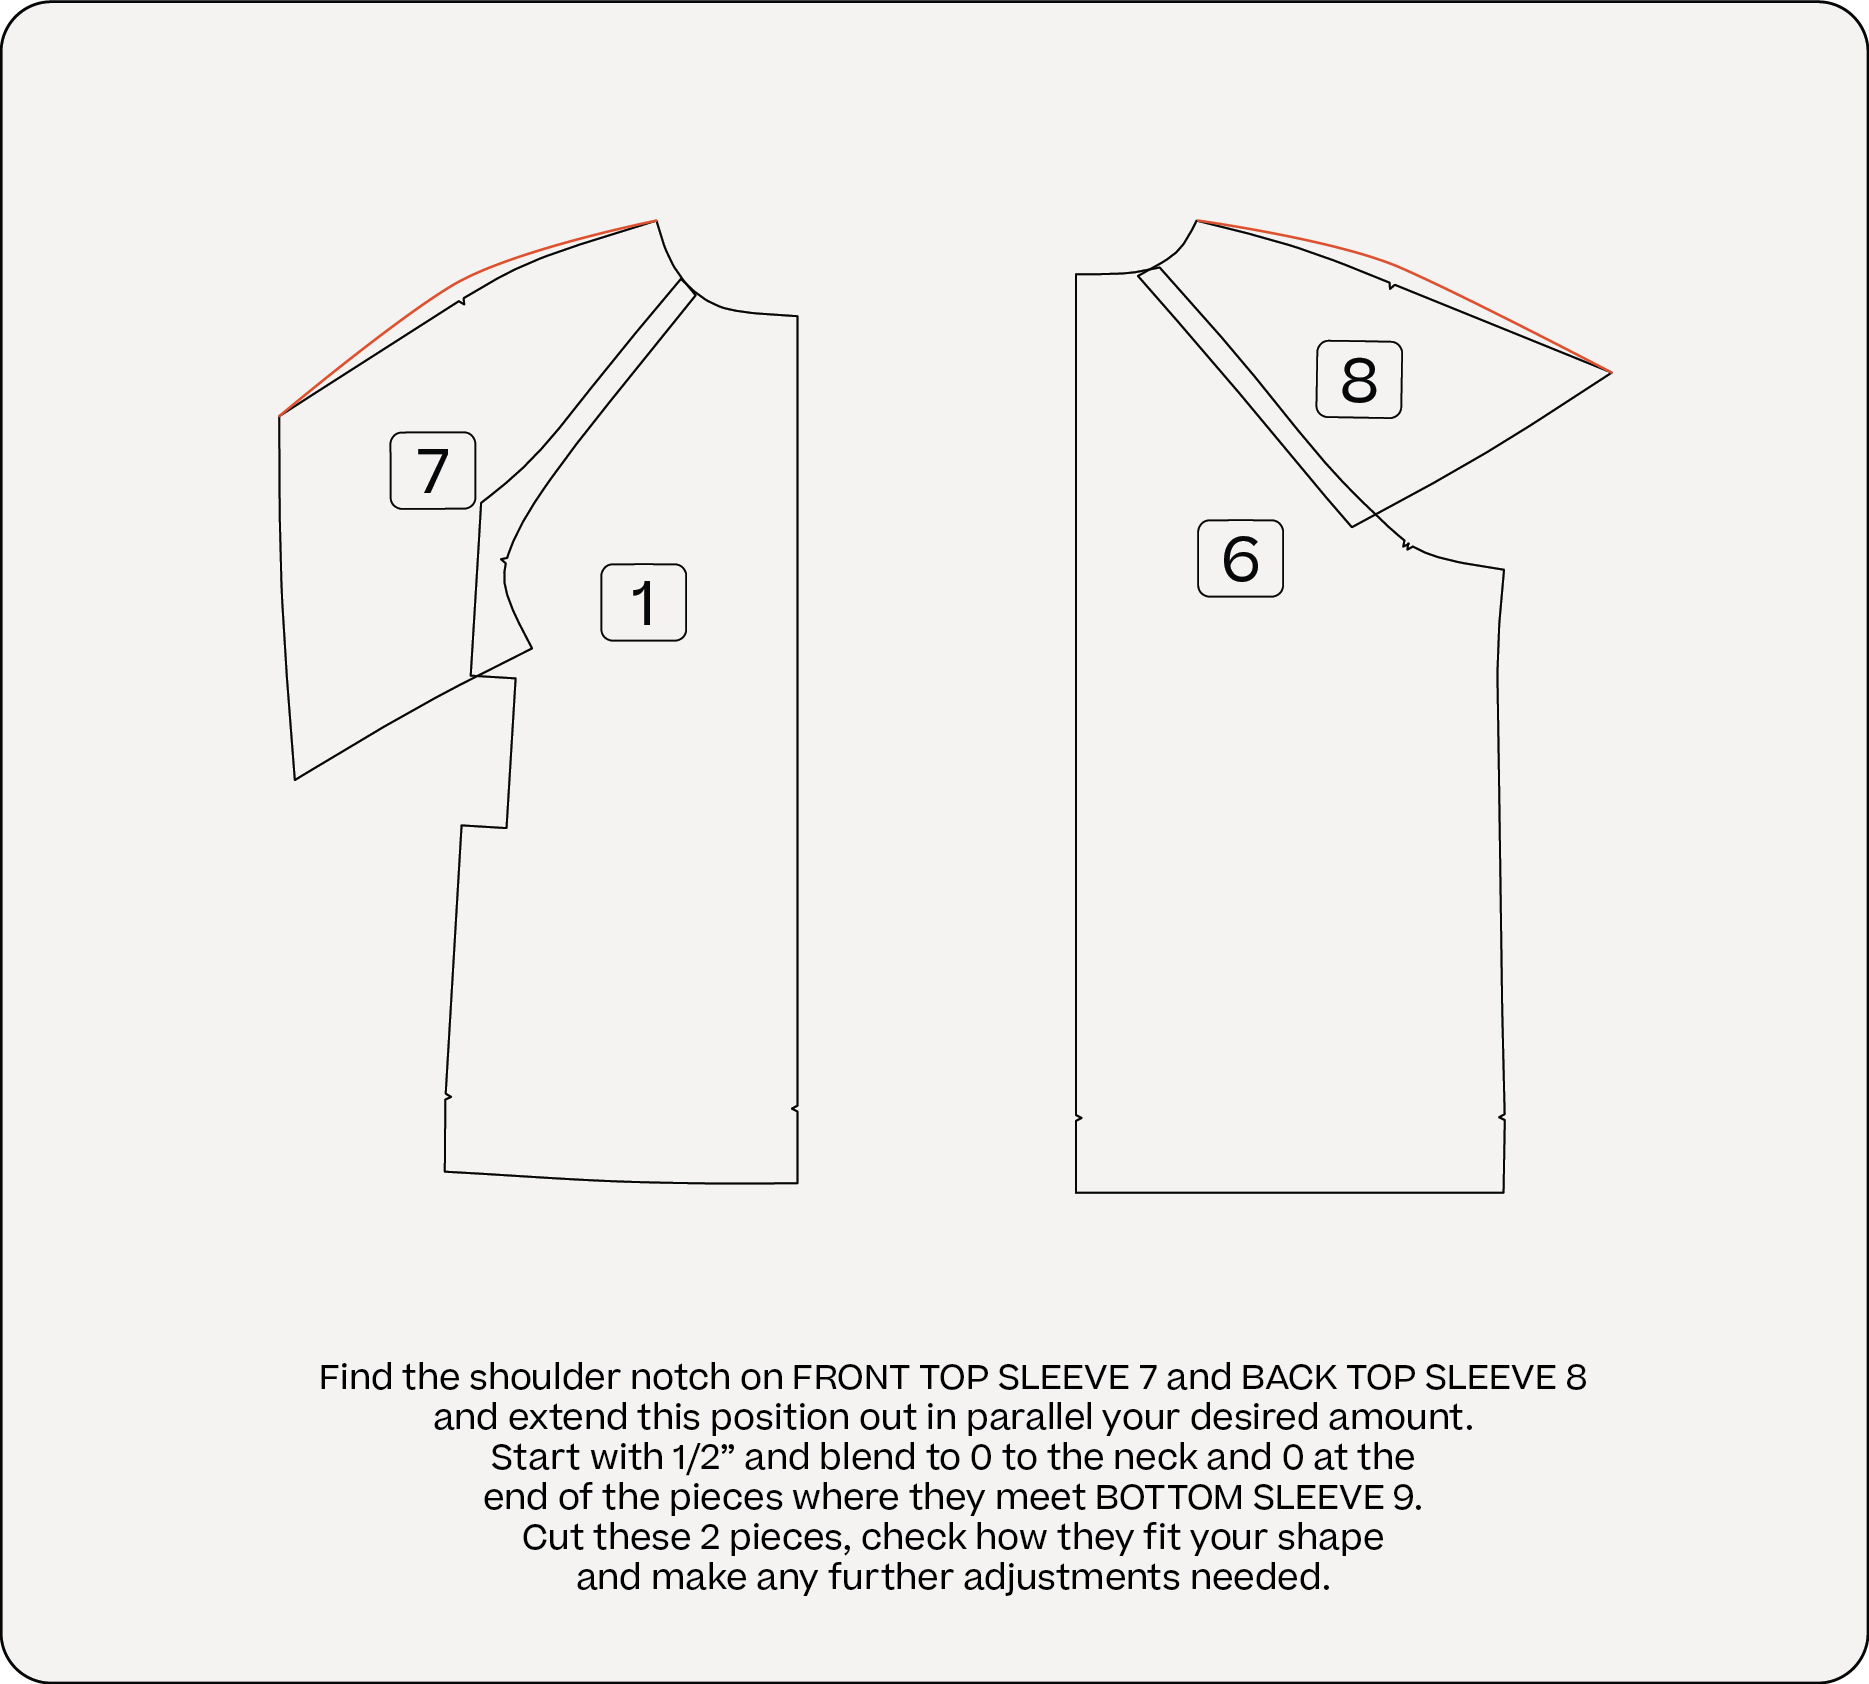
JJ size range : The neck across all sizes was updated after some more research. This affected CENTER FRONT 1, BACK 6, FRONT TOP SLEEVE 7 and BACK TOP SLEEVE 8. You won’t need to reprint the entire piece of each but just the areas where the neck is. You’ll also need to print a new collar which shifted with the neck opening. This range had the same updates as the DD with the 2 collar pieces and fuse pieces added.
What is the difference between the regular/original coat and the quilted version?
The biggest differences are the rounded hem and neck for easier binding and the reduced seam allowances at the edges, also to accommodate binding. There’s also no facings and single pattern pieces for the collars while the regular/original has updated separate inner/outer pieces.
Any recommended fabrics / mods to make this a good winter coat?
Fabric choice is going to be your best bet here. Choosing a wool coating for the exterior will give you the a great amount of warmth. I’ve also loved the oilskin / wax canvas version too which help with making the coat more water resistant if you live in wetter areas of the world.
Also consider your lining. Choosing something like a flannel will give you even more warmth. I know we typically think of flannel as being a plaid but it also comes in solids!
Is it possible to add a zipper to the front?
To add a center front zipper you would need to remove the placket extension and get the pattern piece to finish at the true center front (this would be were the middle of the buttonholes are on CENTER FRONT FACING 11). Don’t forget to add your seam allowance back! You’d do this to both FRONT 1 and CENTER FRONT FACING 11, then insert your zipper there.
As for getting a zipper in behind the placket that’s a whole other can of worms that’s hard to explain via text! If you have a personal garment that looks like this you can try to follow what was done there and where to line things up.
This is definitely an application I’d like to do on a future pattern!
Any tips on getting the welt pocket just right?
Go slow, practice and if it’s helpful, mark all your sew lines with chalk so you know in sewing that every little millimeter is lining up.
Can you use pre-quilted fabric for the quilted version?
Absolutely! There are more instructions for quilting yourself but you can easily use pre-quilted fabric.
Recommendations for where to buy nylon / waterproof fabric?
Here are a few great options but remember that a full waterproof garment is not achievable in most home sewing unless you apply bonding over seams. Water resistant however is much easier to achieve. (See Eira’s exploration in making a bonded trench coat). You can use waterproof fabric but the seaming finish is what makes or breaks the garment being truly waterproof.
-
Ripstop by the Roll has a 3.4 oz Supplex Nylon. FYI, another name for supplex is taslan which will help in searching online.
-
Mood has an even lighter 2.8 oz Crinkled Nylon Taffeta. This would be great for a coat hinging on packable. Also ON SALE right now with other colorways.
-
Zelouf has a heavier 5 oz Taffeta Blend in a ton of colors! I feel like they are somewhat of a fabric hidden gem. Wide range and all with multiple color options.
P.S. when you’re shopping you’ll often see fabrics listed as either in GSM (grams per square meter) or OZ (ounces). 1GSM = .0295 OZ. Happy calculating.
Is it easy to hack a fully attached hood?
Ish. The hood was created to have extra circumference at the neck opening. This way it sits nicely over the neck and collar of the coat and isn’t right up against your face. If you were to hack this I would blend up in the neck opening of the body and down in the neck opening of the hood instead of only adjusting the hood to match the body.
Remember to always work on SEW lines when adjusting any patterns and add your seam allowances back in.
Is the quilted version reversible?
It is not. I decided to go with non-reversible since there is way more involved if self quilting and with the welt pockets. If you are looking to make it reversible you would make the coat without any binding then essentially make a second coat (most likely without the welt pockets), sandwich them together and then bind the edges. Be mindful of your batting weight if you do this. I’d quilt both sides with a low pile batting or you could do batting quilted only to the outer side and just quilt stitch lines to the inner.
Always check the thickness before you begin!
Could you do an FBA without adding darts? Maybe similar to the Bonnet Shirt tutorial?
I would do it like this.
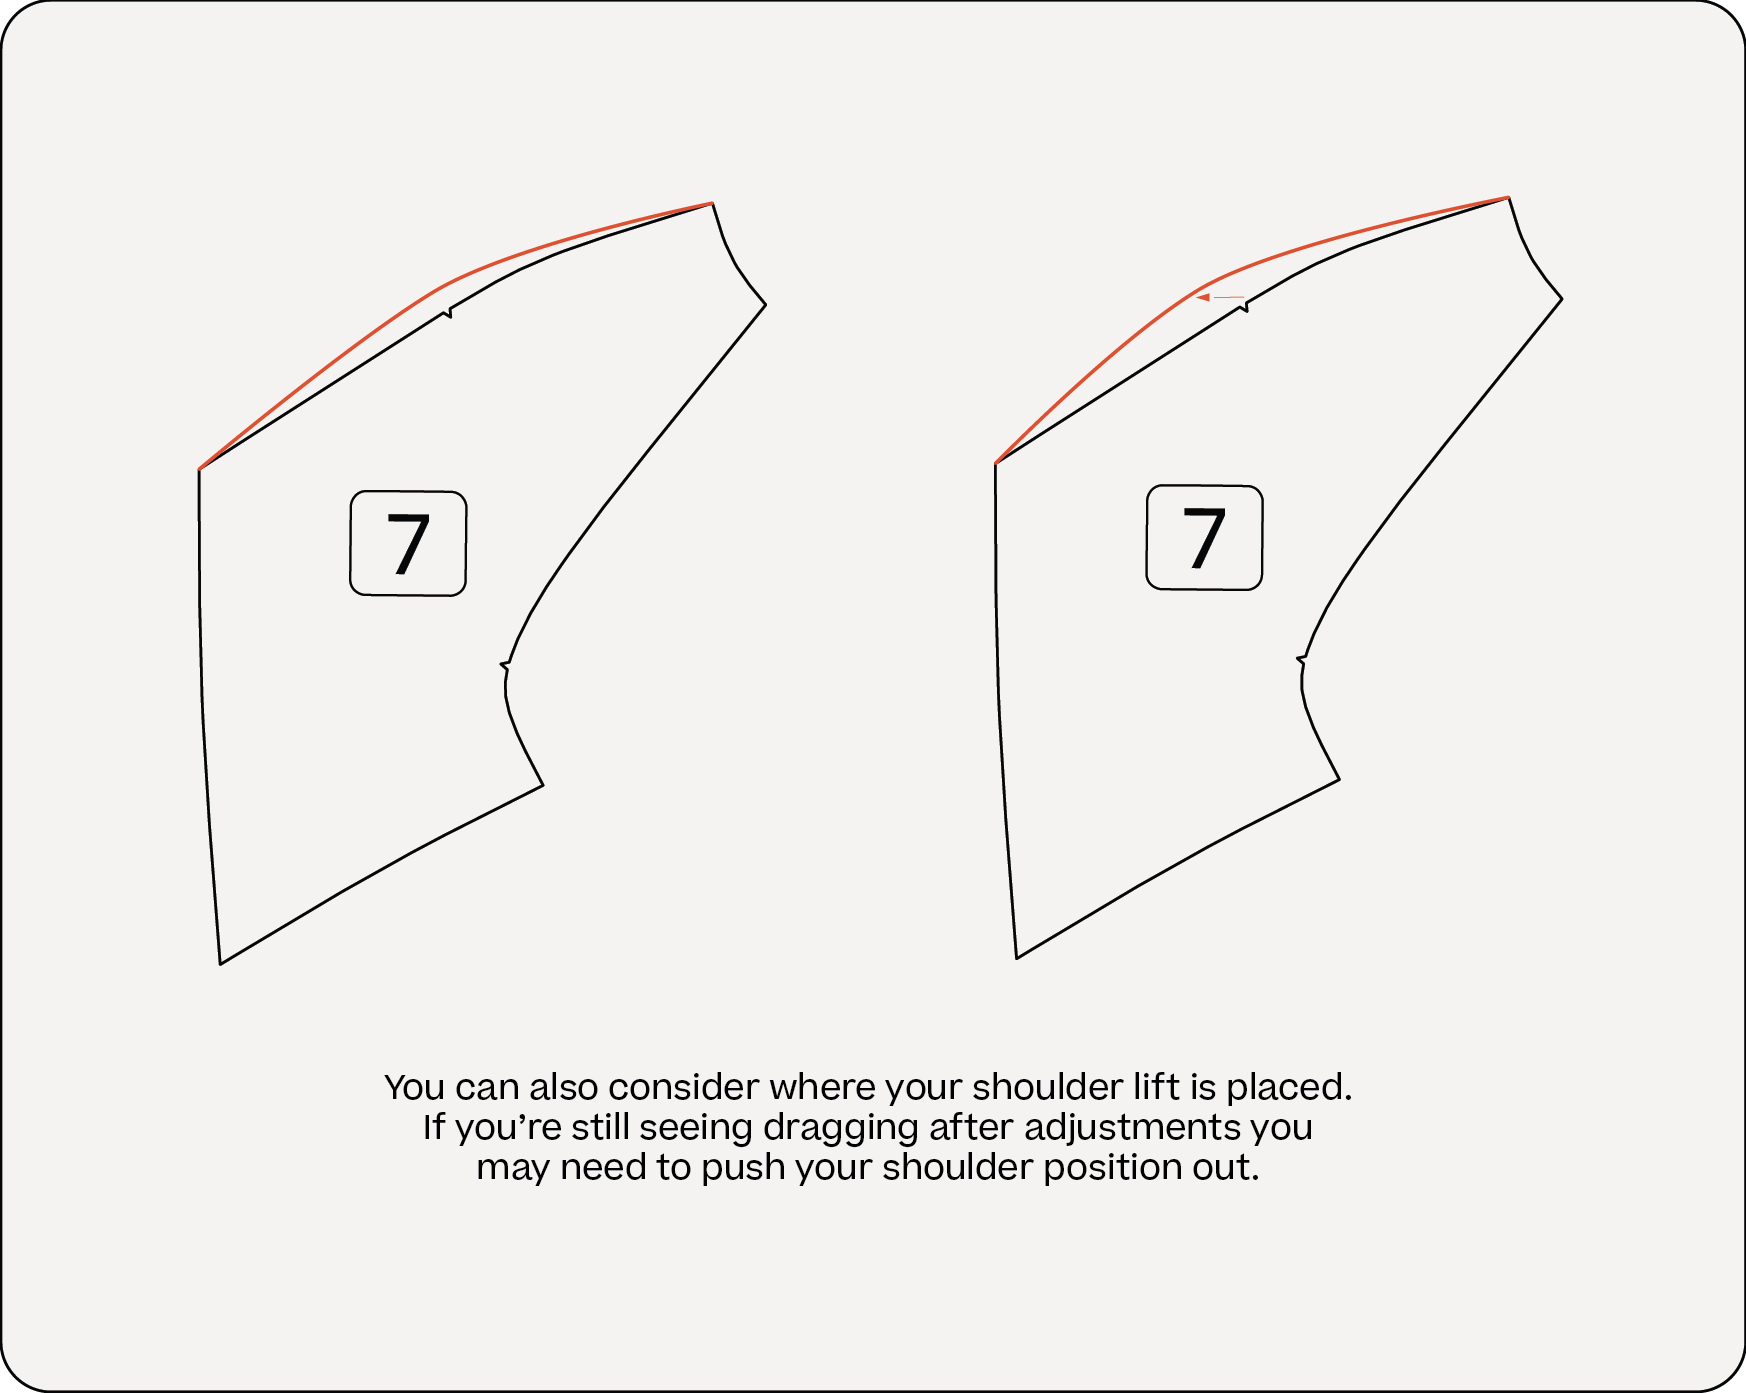
How do I do a broad shoulder adjustment? I want to maintain the body proportions and not size up to accommodate my wider shoulders.
When you draft a raglan or dolman sleeve you’ll see when drawing the shoulder seam that the shoulder point get lifted. This is because a set in sleeve can get more anatomical in shape and act as a hinge with its 2 pieces A raglan is a single piece so we have to create hinge at the shoulder point area.
If you find that you have broader shoulders you will need more lift in the hidden hinge.

Next week I will start answering your questions on becoming a pattern maker and starting a home sewing business. While I was away the internet was quite abuzz on these subjects. I will not be commenting on that but more just answering your questions and giving you insights on how I personally operate.
I’ll share out a general calendar that again works with my business so you can see the scope of what goes into it. And I’ll share some general financials and growth over the past 3-ish years.
Next weeks will be free and the following will be for paid subs.

Coming quickly on the Thompson heels is the new Rebel Jumpsuit! Look out for the listing next week with yardage and size info and meet this dress/jumpsuit hybrid November, 13th!
