

My second post here on Substack was introducing the new Teague Dress pattern. In it I discussed how I’ve tried many times to be an oversized dress girl. You know, the Copenhagen type girlies. There was even a social media moment around it early last year.
In my research and development over the past few months around the concept I’ve come to the conclusion that it’s bifurcation that I need, always, and maybe you do too. There is just something about my lower half that needs more fabric contact to feel safe and secure out in the world.
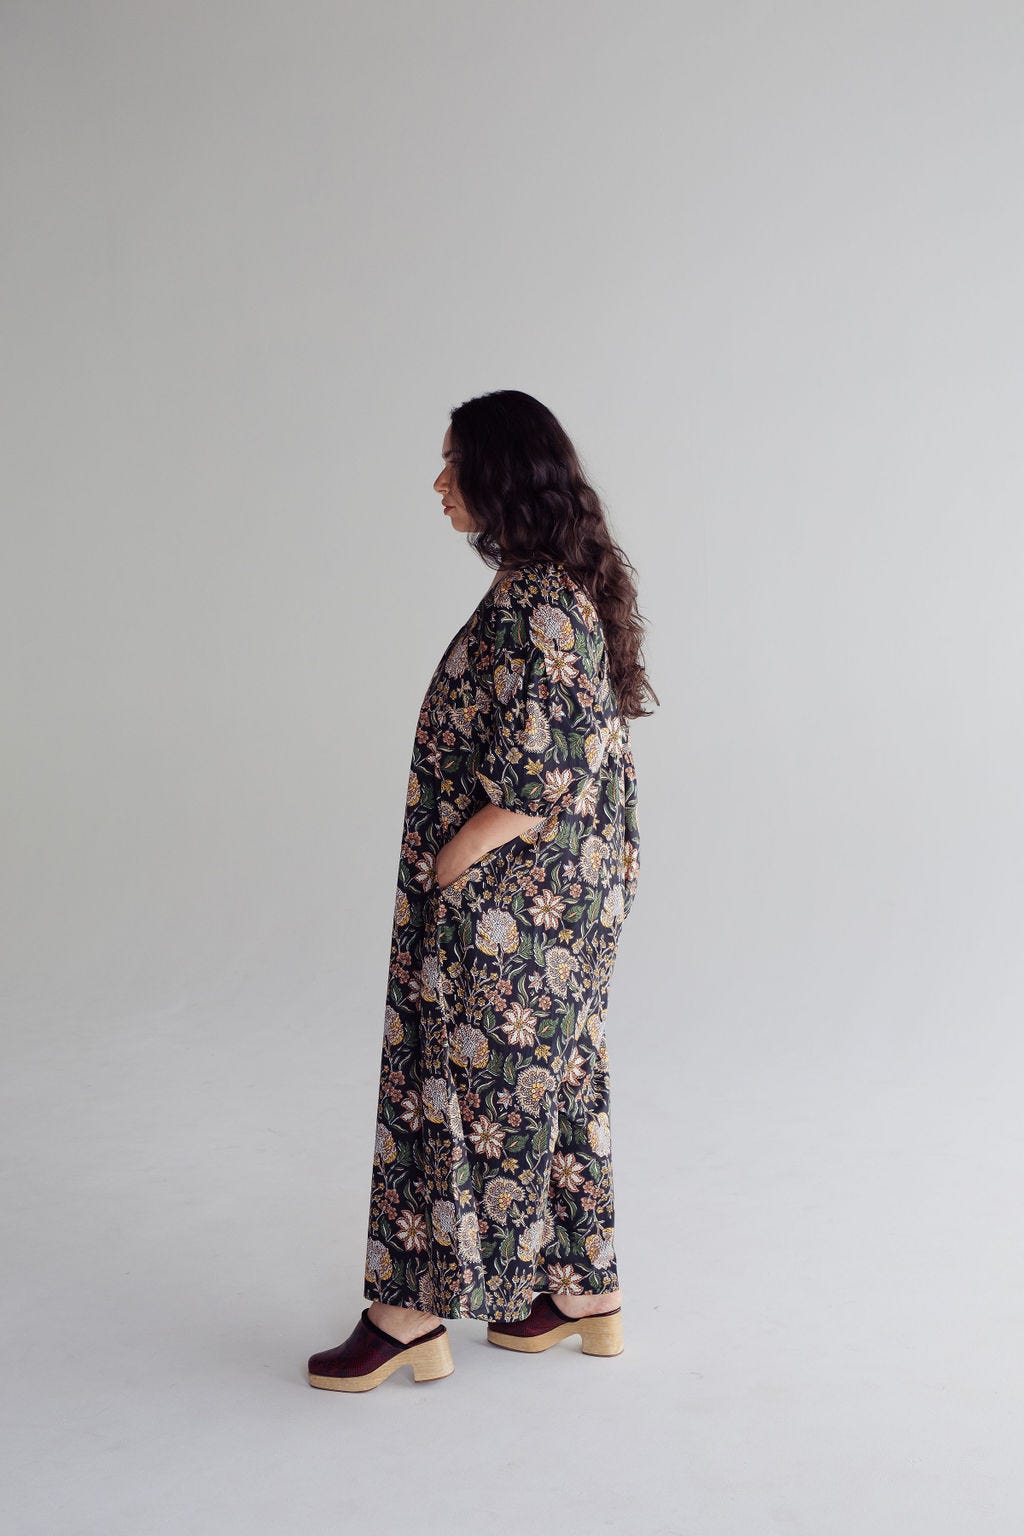
So to my other oversized dress skeptics, you may just need some legs and the Rebel Jumpsuit may be what you’re looking for.
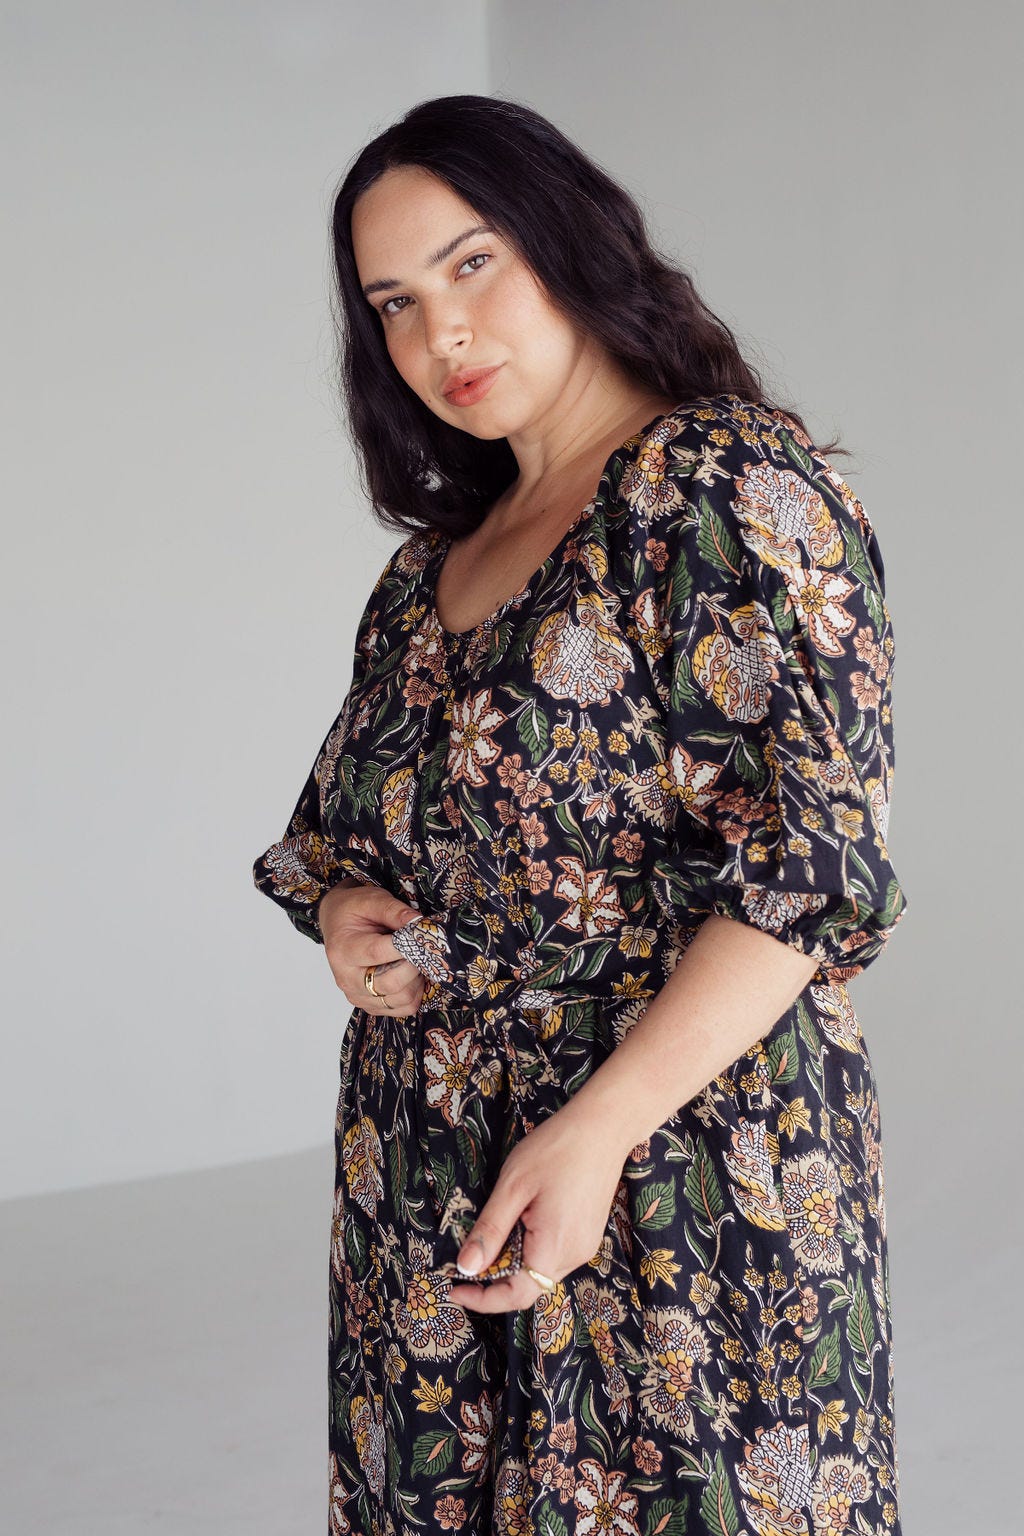
This is the first pattern that feels like a deeper departure from the structured pants and coats you may be used to from Daughter Judy. I’ve been feeling the urge to create something more feminine lately and was reminiscing of the early 2010s days of Black Crane and Electric Feathers’ oversized yet sculptured silhouettes. A bohemian modern era so to speak.
When I started designing into the Rebel I wanted it to have a low effort execution with an unexpected outcome. I kept the gathering to a minimum and concentrated them around the body to create a more intentional look. The addition of topstitching is, as always, a no brainer. I love what it does to the final outcome of this simple jumpsuit in a crisp poplin.
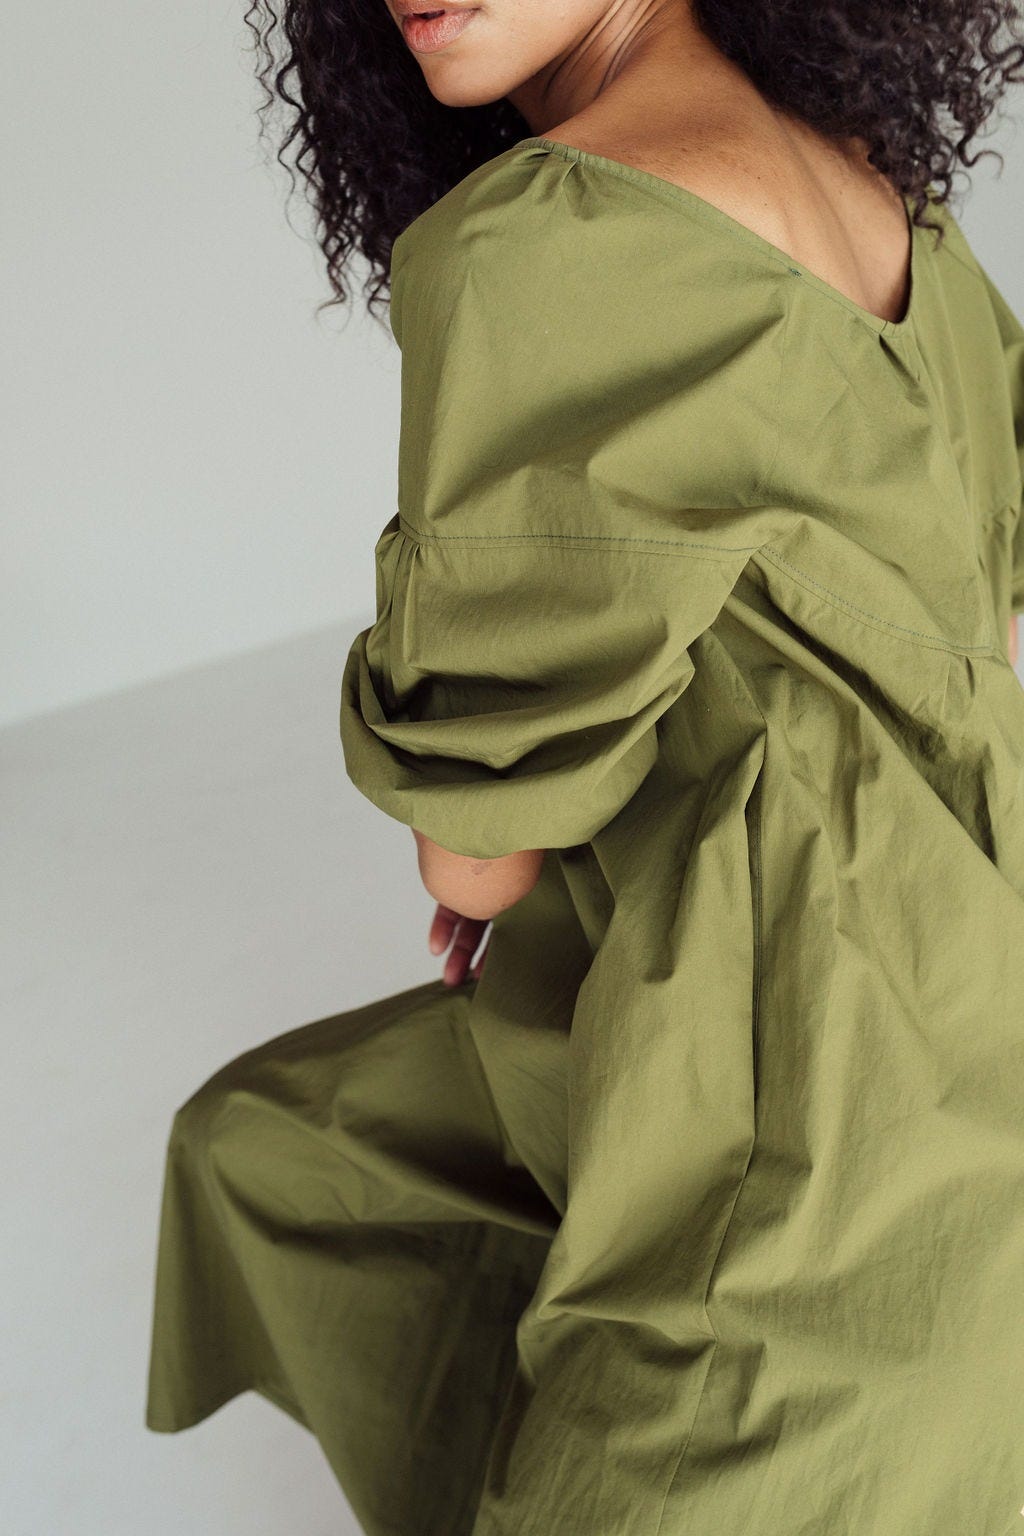
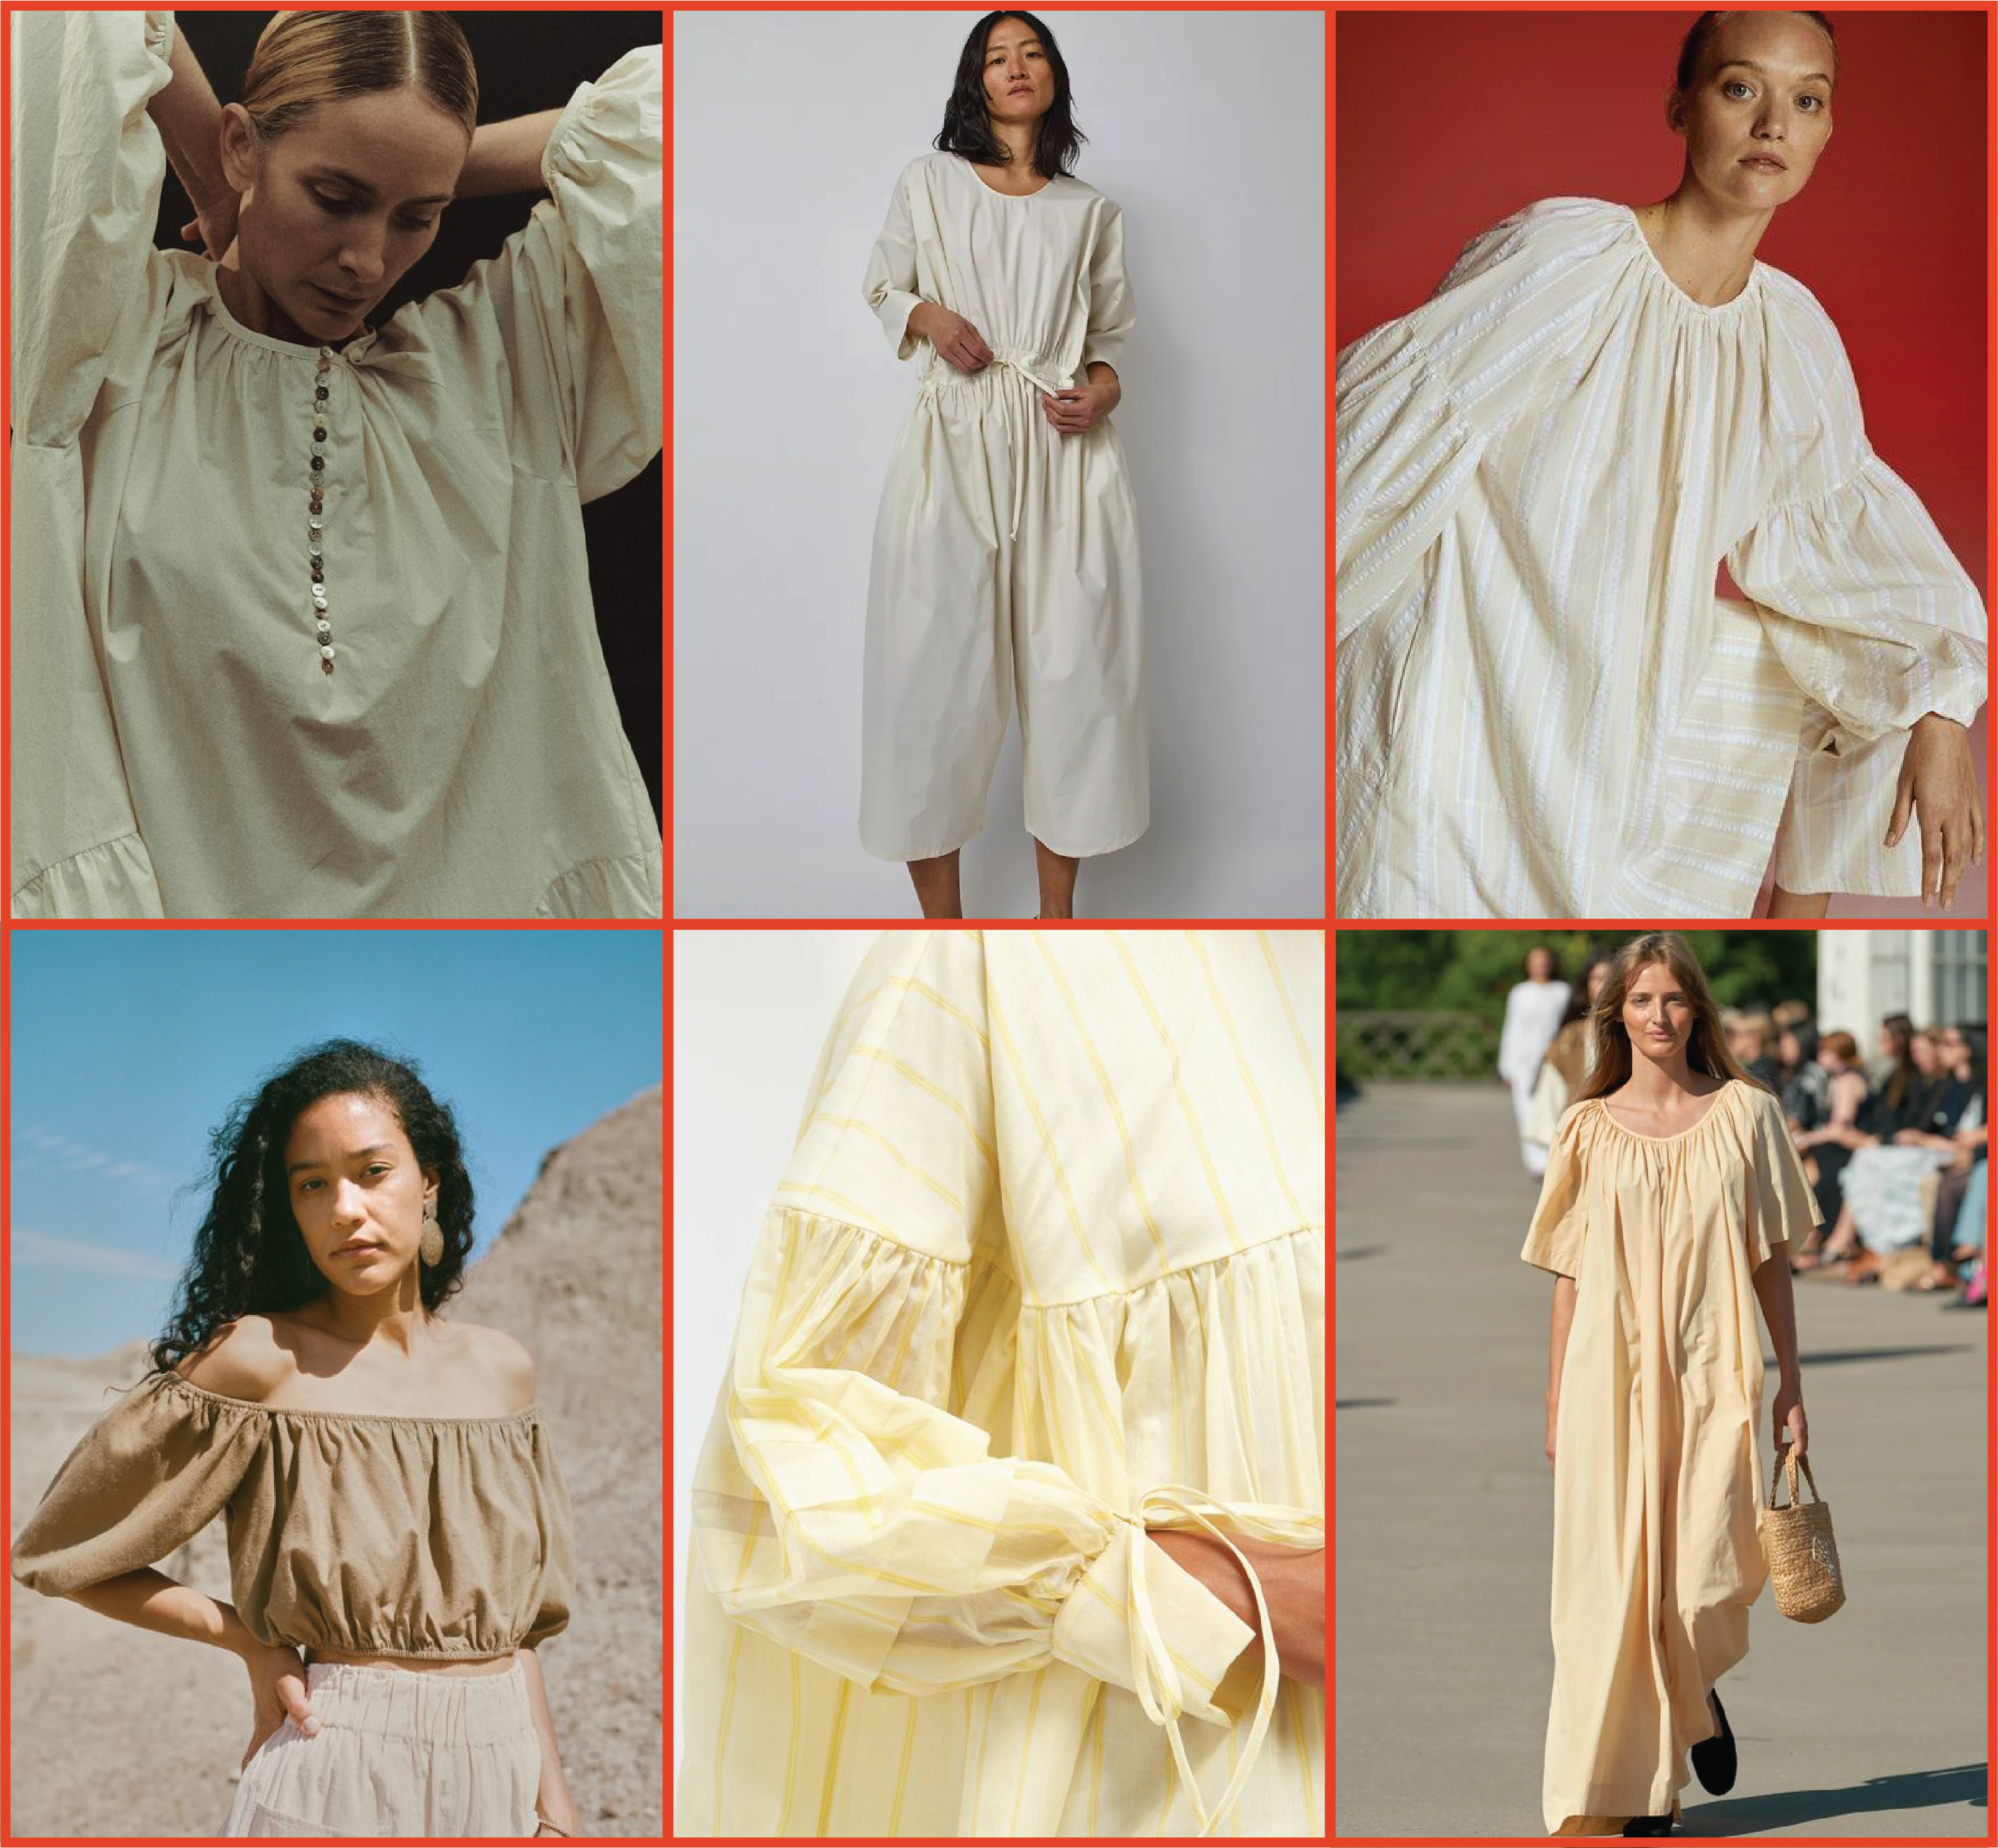
I went back and forth about the elasticated cuffs wondering if they were too fem but decided to keep them. The silhouette needed that final addition of poof to tie it all together. If you’re not an elastic fan, binding the openings and leaving ties are a great sub (see below middle image). Or create a structured cuff and pleat the sleeve opening to fit. This would be super cool.
The belt is how the silhouette morphs the most. When suppressed it gives a top and wide leg pant look while unbelted it’s a breezy “dress”. The topstitching on the belt also aids in giving a more structured look and I highly recommend running multiple rows at 1/4” spaced stitching along the full length. Trapunto baby.
So what about this has convinced me on gathers, elasticated cuffs and self belts? Fabric. For me the crispier the better but I also love the idea of making this in a tropical weight wool styled with Blundstones and my not yet complete Maya Sweater for the winter months.
This would also be a great choice for the upcoming holiday season following in Katie’s footsteps. She made hers in a mystery fabric (if I remember correctly) and cut the sleeves in an organza. Brilliant. I personally can’t stop thinking about a hammered silk version but that will most likely have to wait until next year.

What fabric works best here? Crispy architectural fabric?
Personally I like a crispy poplin. The green fabric in the photos is the Washed Cotton Poplin from Blackbird and it is perfection. However, it can handle most light weight to light-mid weight fabrics and said fabric choice can really change the final outcome. Go with a cotton gauze, seersucker, or batiste for a very prairie-core summer time effect. A hammered silk, tropical weight wool, or organza would give you something more formal.
How do you get in and out?
The jumpsuit is step in. There is a keyhole at the back neck that is opened and you step in through the neck opening. The length of the keyhole can be adjusted if you’re in between sizes so pay attention to the “neck opening - open” measurement on the finished garment charts.
I’m not sure how to figure out where to measure the rise from?
The rises are measured around 8” inches from the high point of shoulder (HPS). I added these for a better understanding of where the crotch sits against the body since there is a lot of personal preference in that area. The crotch should sit a few inches below the body but if you prefer less and are a different height than the base, understanding where that lands is very helpful.
The best way to utilize this is to add the two rise measurements together plus 16”. Example: Size XL would be as follows,
Front rise - 26” (66cm)
Back rise - 26” (66cm)
HPS to top of front rise - 8” (20.3cm)
HPS to top of back rise - 8” (20.3cm)
Total - 68” (172.6cm), wrap this measurement using a tape measure or two around your torso and through your legs to get an understanding of where the crotch will be.
My greatest fear is a floppy butt (too long in the rise). Should I get over myself or is there a way to fit this a bit?
I get it, no one likes a floppy butt. When the belt is used it does help pull the lower torso area up and in effectively bringing the garment closer to your body which fills the shape out more. When the belt is not used, and that is how you intend to always wear it, you will most likely want to make length and depth adjustments to get the jumpsuit to sit closer. If you do make those adjustments and will still use the belt, make sure to test this out in fitting as it may end up too close when the belt is suppressed. Always check the fit seated too!
Did I read somewhere about a top hack?
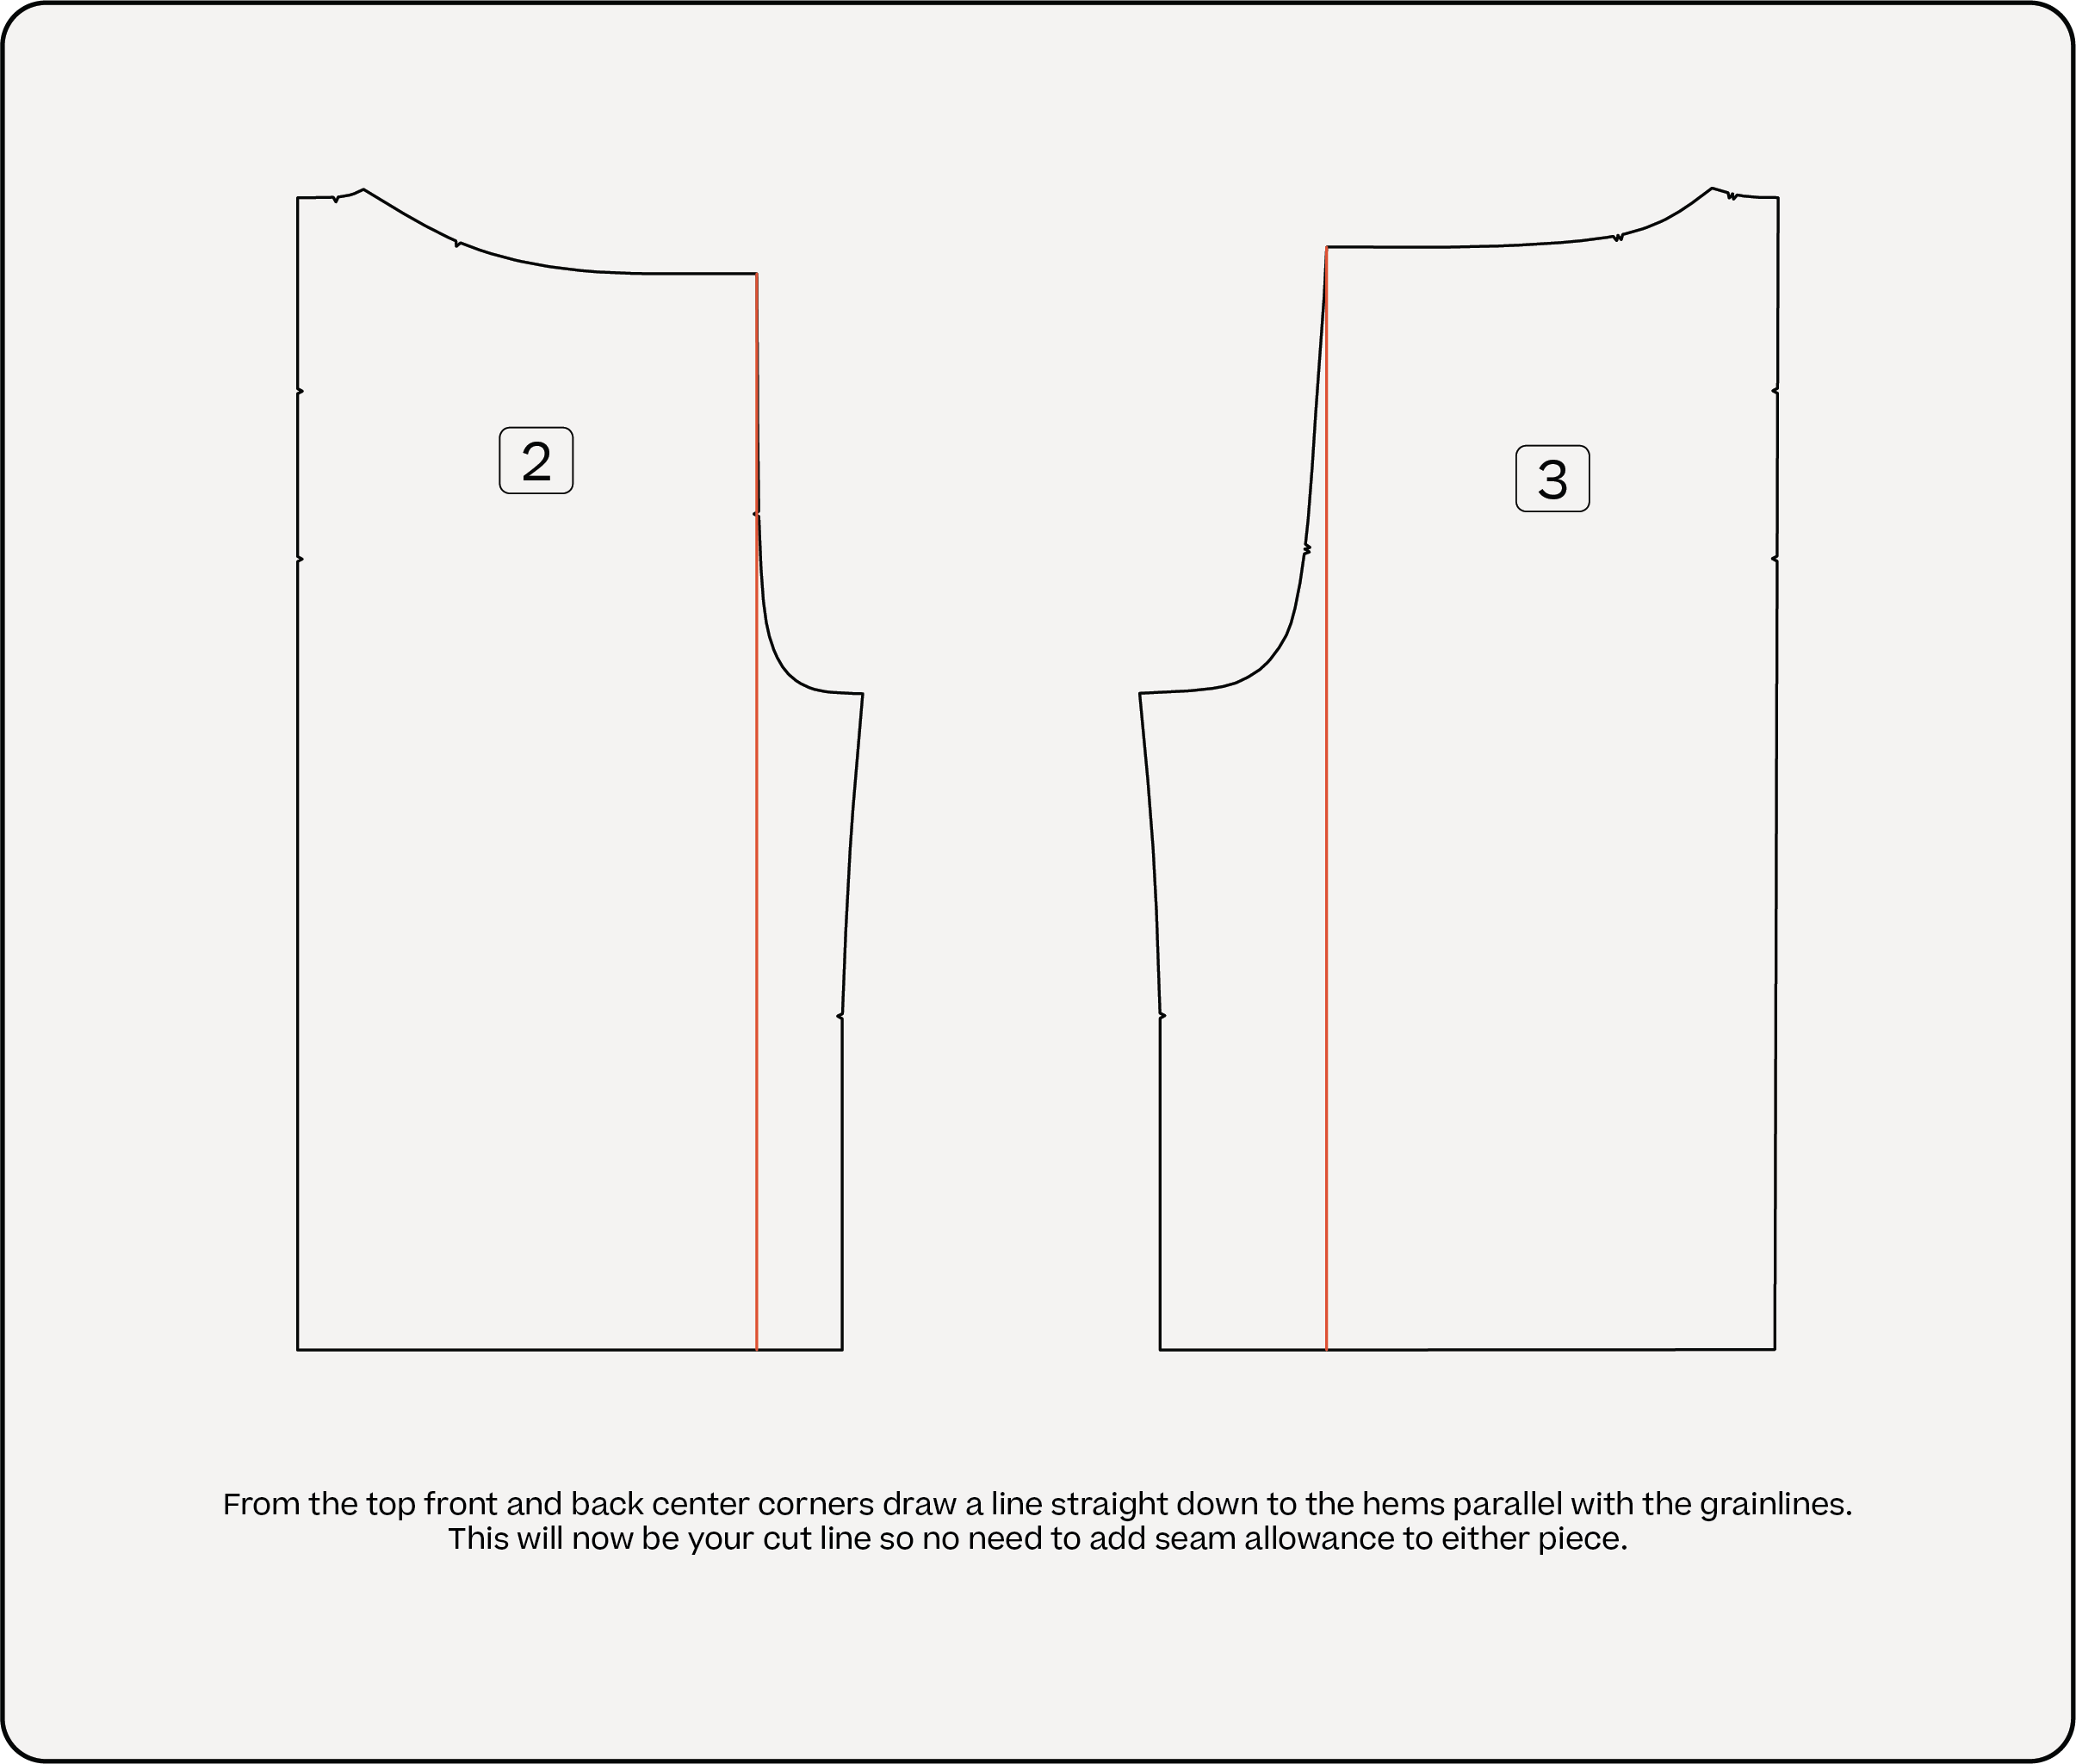
There is a very easy top hack you can do which is basically cutting the top section off at the lower pocket notch position (perpendicular to the grainline) of piece FRONT 2 and BACK 3. Then press the hem 1” (2.5cm) then under 1/4” (6mm) to create a tunnel and thread 1/4” (6mm) elastic through the tunnel at your desired length. You can of course choose your length position and go shorter similar to the bottom left photo in the above mood board. Remember once the elastic is put in, if too tight the elastic will always be searching for the smallest area of your body. I always recommend cutting longer and loose til you find the best fit for you!
Can I make it as a dress? I like the idea of a jumpsuit but not wearing them?
The most asked question so here you go! Super easy and may be the shortest diagram yet.

We are another week closer to the 1st Annual Daughter Judy HOLIDAY READER
A digital magazine with maker spotlights, tips, recipes, holiday guides and of course the next subscriber pattern! I’m very excited for this next pattern and I think you’ll all get a lot of use out of it over the next few months and beyond.
Make sure you’re signed up below and watch your inbox on December 10th!